All billets start with at least 75 pts carbon. The wrought iron is used as the outermost layers
to minimize loss of carbon during the welding process. The usual billet starts with:
13 layers: WI-L6-O1-L6-O1-L6-203E-L6-O1-L6-O1-L6-WI or
17 layers: WI-L6-O1-L6-5160-L6-O1-L6-203E-L6-O1-L6-5160-L6-O1-L6-WI
and is folded 5 times (432 to 544 layers). Depending on the desired pattern, the bars
may be twisted, incised, or punched to generate specific patterns.If you're
interested in getting a closer look at the process, click
here.
Forging:
All blades are hand-forged (using a gas forge, a
Chuck Robinson anvil, and a certain degree of sweat).
Heat Treatment:
The heart of a good knife is the heat-treatment and it starts with the forging process. To
counteract the obvious deleterious effects of welding heat on grain structure, all billets and
all knives are heat-cycled at least three times. The result is extremely fine grain, a necessity
for a strong knife.
Austenization typically involves a lava-pot (high-temp
salt bath at 1525 F) - which minimizes scaling and warpage - and a low-temp salt pot (~475 F)
to produce a banite crystalline structure. While use of salt pots imply digital pyrometers,
dedicated gas forges, and a certain degree of anxiety, the result is well worth the effort.
Testing:
Given the number of variables involved, there is only one good way to insure that you, the customer,
are getting your money's worth - destructive testing. A trial blade (or one with a flaw that
prevents it from being sold) is subjected in my shop to three critical tests.
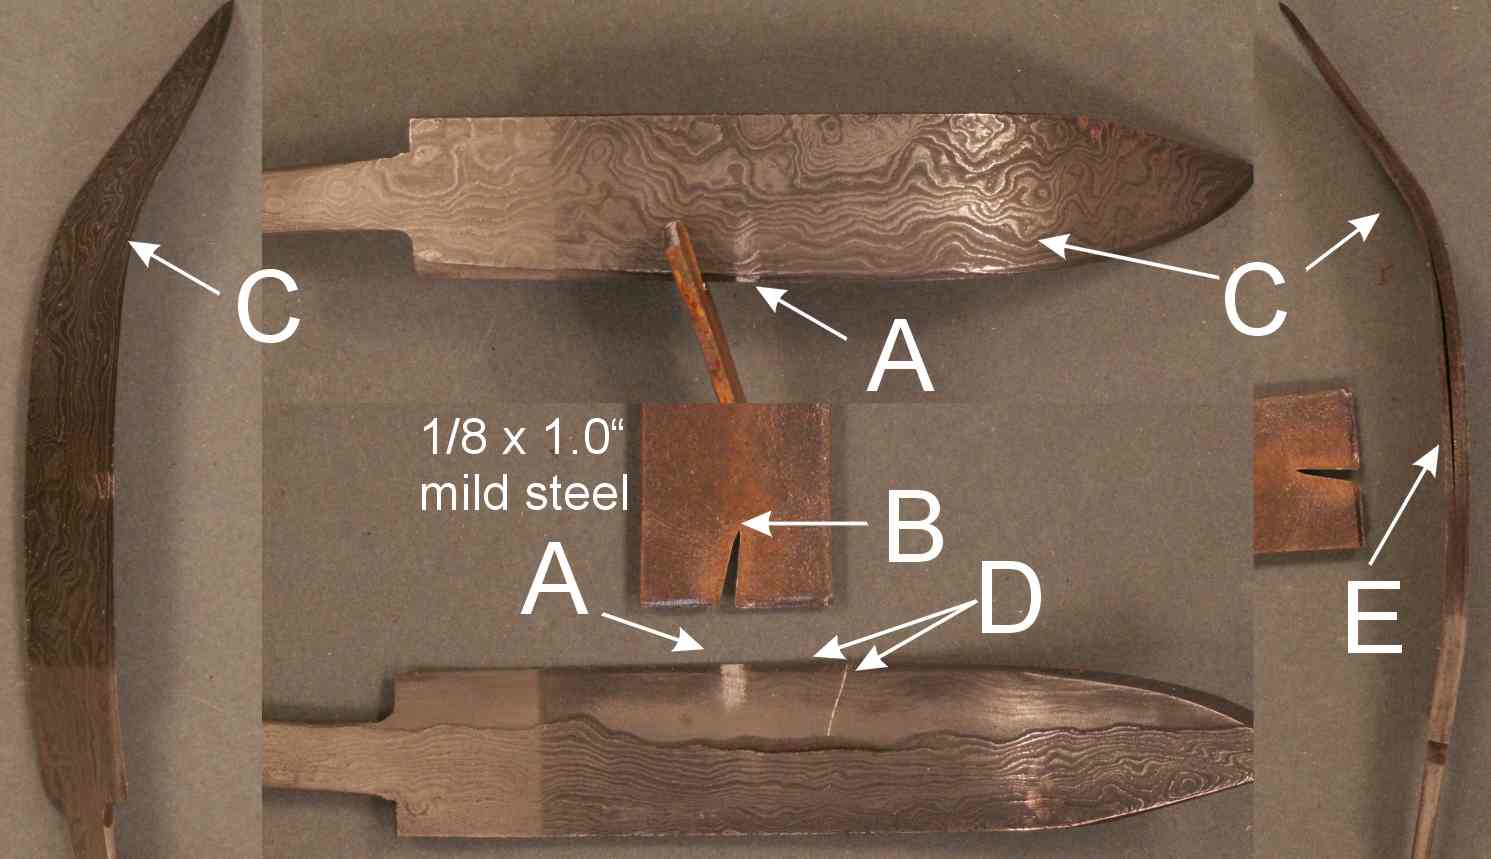
The blade shown here was a san-mai constructed blade with an O1 core and two side panels of 544
layer Damascus.
(1) Hardness can be determined with either a Rockwell Hardness Tester (that leaves
a pit in the steel and assumes a flat - not tapered - test piece) or a set of test files. The
hardness tester is supposedly a more accurate measure but when non-calibration and a tapered
cross-section are figured in, the improvement over the files is problematical. In the image below,
the scratches marked 'D' (left to right) were made by files with hardnesses of Rockwell C 55 and 60.
The 55 C scratch is not really discernable in the picture while the 60 is clearly visible, indicating
a hardness between 55 to 60. The target is 58 - a hardness that is a reasonable compromise between
edge-retention and the customer's ability to resharpen the blade - and it has been achieved.
(2) Toughness can be determined by driving the edge into mild steel and observing the effect
on the edge. In this case, the blade was driven into a piece of 1/8" thick mild steel with a 3-lb
hammer. The mark at 'A' was the result on the blade while the slice at 'B' was the effect on the
mild steel. You will note that except for disturbing the patina on the blade, the edge was unaffected.
(3) Flexibility is tested by bending the blade laterally. The tip was locked in a vise and (using
a long cheater bar) the blade was bent through 90 degrees (at 'C'). On release, the blade sprung back to
the degree of bending visible in the picture.Note that the edge did not crack and the blade did not break.
The reason for this blade's selection as a test subject was two-fold. The light area visible just in
front of the tang indicates that the blade was not fully immersed in the high-temp salt (my bad -
these things happen when there are four blades being dunked together and the smith didn't pay
enough attention to each and every blade). While the fix is simply to repeat the heat treat, the second flaw
was more significant. The side-panel of Damascus on the left side of the blade appeared to have a
weld separation (follow the scratch at 'D' back to the interface of the O1 core and the Damascus).
Sure enough, when subjected to a beating with a big hammer and being forced through a right angle,
the weld failed (marked 'E'). What is interesting is that the right side held fast as did most of the left side -
thus showing that a good forge weld is a really good weld!
Obviously not all blades are subjected to these tests since then nothing would ever leave the shop.
Tests are run when either a new steel is used, a new heat-treat is applied, or just occassionally
to make sure everything is still up to snuff. If someone wants to know why the price I charge is
justified, one answer is the underlying quality of the material.
Fit and Finish:
Final grinds on Damascus blades are in the 1500 grit neighborhood, followed by a dilute HCL
etch. Wood is stabilized under vacuum using either a wood sealant or polyurethane. Fittings vary
from brass to nickel silver to sterling silver to mokume. Sheaths are available on most of
the more expensive blades and can be made for the less expensive ones at a modest cost.
|